ice-scripts到ice.js实战迁移之路

为什么要升级?
| 纬度\版本 |
icejs 1.x |
ice-scripts 2.x |
ice-scripts 1.x |
| 定位 |
研发框架 |
构建工具 |
构建工具 |
| 配置文件 |
build.json |
ice.config.js |
package.json(buildConfig) |
| 文档地址 |
访问 |
访问 |
访问 |
| 发布时间 |
2020.02 |
2019.06 |
2018.02 |
| 可渐进升级性 |
好 |
不好 |
不好 |
| 插件能力 |
工程+运行时 |
工程 |
无 |
| 工程配置 |
强 |
强 |
弱 |
| 运行时配置 |
默认支持 |
默认不支持 |
默认不支持 |
| SSR |
支持 |
不支持 |
不支持 |
如果你看了这个对比还无法决定,那么说一说我迁移的原因:
- ice-scripts官方不维护,查找文档较难
- 解决技术债
- 我想使用一些新的功能,例如:Hooks and Function Components(当然并不是说不升级就不能用)
- 新的前端工程方式,我之所以这么命名,因为我不是一个专业的前端开发,无法将自己的注意力集中在前端领域,只好跟着大厂,这样就不会迷路。这次新版本配置的
eslint prettier挺有用。
- 前端权限的简洁化(之前推荐的是ant deisgn auth真心不好用)
- 布局的简介化
Hooks and Function Components扫盲
快速一览
props非必须,两种方式:
1
2
3
4
| const Example = (props) => {
// You can use Hooks here!
return <div />;
}
|
1
2
3
4
| function Example(props) {
// You can use Hooks here!
return <div />;
}
|
使用useState处理函数组件的状态,例如:
1
2
3
4
5
6
7
8
9
10
11
12
13
14
| import React, { useState } from 'react';
function Example() {
const [count, setCount] = useState(0);
return (
<div>
<p>You clicked {count} times</p>
<button onClick={() => setCount(count + 1)}>
Click me
</button>
</div>
);
}
|
这里要注意的是setCount异步函数,它不会改变count,而是创建一个新的count。而且在接受同一个 state 对象时,即使其对象里的属性变了,但对象地址没变,是不会更新视图的。
函数中的 setXXX 注意事项:
1. 不可局部更新视图
2. 地址一定要变
函数组件模拟生命周期
函数组件没有生命周期,但是 React Hooks API 提供了 React.useEffect 来解决此问题。
模拟 componentDidMount 第一次渲染
1
2
3
| useEffect(()=>{
console.log("第一次渲染");
},[])
|
模拟 componentDidUpdate
只有n变化才会调用
1
2
3
| useEffect(()=>{
console.log("n 变了");
},[n])
|
任意值变化,都会调用
1
2
3
| useEffect(()=>{
console.log("任意属性变了");
})
|
模拟 componentWillUnmount
1
2
3
4
5
6
| useEffect(()=>{
console.log("任意属性变了");
return ()=>{
console.log("该组件要销毁了")
}
})
|
React函数式组件路由使用
- useHistory
- useLocation
- useParams
- useRouteMatch
这里仅举例history的使用
1
2
3
4
5
6
7
8
9
10
11
12
13
14
15
| import { useHistory } from "react-router-dom";
function HomeButton() {
let history = useHistory();
function handleClick() {
history.push("/home");
}
return (
<button type="button" onClick={handleClick}>
Go home
</button>
);
}
|
迁移
迁移前项目:https://github.com/xaecbd/KafkaCenter/tree/v2.1.0/KafkaCenter-Frontend
迁移后项目:https://github.com/xaecbd/KafkaCenter/tree/dev/KafkaCenter-Frontend
总体花费三天,代价还可接受。
迁移方式
最开始是按照官方文档迁移的,但是操作完成以后,发现无法运行。问题主要在于迁移文档未说明布局和菜单的迁移,这两块地方和之前相比有很大变化。最终采用新建pro项目模板,将原系统组件和页面迁移,这里就看出react 组件化的价值了。
这里推荐一下vscode 中的ice插件,使用很简单,唯一问题是预览图片太小。
工程能力迁移
之前是package中配置的代理,插件。以及别名等。现在迁移到根目录的build.json
1
2
3
4
5
6
7
8
9
10
11
12
13
14
15
16
17
18
19
20
21
22
23
24
25
26
27
28
29
30
31
32
33
34
35
36
37
38
39
40
| {
"alias": {
"@utils": "./src/utils/",
"@components": "./src/components",
"@images": "./public/images"
},
"outputDir": "../KafkaCenter-Core/src/main/resources/static",
"proxy": {
"/**": {
"enable": true,
"target": "http://127.0.0.1:8080"
}
},
"plugins": [
[
"build-plugin-fusion",
{
"themePackage": "@alifd/theme-design-pro"
}
],
[
"build-plugin-ice-auth"
],
[
"build-plugin-moment-locales",
{
"locales": [
"zh-cn"
]
}
],
[
"build-plugin-css-assets-local",
{
"outputPath": "assets",
"relativeCssPath": "/"
}
]
]
}
|
其中build-plugin-ice-auth是原项目没有的,这个主要是用来做项目权限的插件。
菜单迁移
目录结构的调整:
迁移前位于:KafkaCenter-Frontend/src/menuConfig.js
迁移后位于KafkaCenter-Frontend/src/layouts/BasicLayout/menuConfig.js
内容不用修改,权限有点变化,我后面再说
自定义菜单图标
关于菜单图标问题,由于FoundationSymbol废弃,造成大量的图标丢失,默认显示的是Icon中的图标,但是这里面的图标很少,满足不了我的需求,因此我采用了自定义图标。
官方无文档,只能自己摸索了。又是血泪史。。。
在iconfont中新建项目,将自己选择的图标放入项目,然后下载,选择其中的js文件。
1
2
3
4
5
6
7
8
9
10
11
12
13
14
15
16
17
| import iconfont from '@/iconfont.js';
const CustomIcon = Icon.createFromIconfontCN(iconfont);
const headerMenuConfig = [];
const asideMenuConfig = [
{
name: 'Home',
path: '/home/page',
icon: <CustomIcon type="iconhome"/>,
},
{
name: 'Favorites',
path: '/favorite',
icon: <CustomIcon type="iconFavoritestarrate" />,
},
]
|
<CustomIcon type="iconFavoritestarrate" /> 这个就是自定义图标,type为你选择的图标的名字。
你以为这样就结束了么???? 后面发现存在图标不对齐

最后通过增加空格解决,这里要注意下NavItem可以通过 ,但是SubNav不行哇,通过\u00a0\u00a0
主要是修改KafkaCenter-Frontend/src/layouts/BasicLayout/components/PageNav/index.jsx代码:
1
2
3
4
5
6
7
8
9
10
11
12
13
14
15
16
17
18
19
20
21
22
23
24
25
26
27
28
29
30
31
32
| function getSubMenuOrItem(item, index,auth) {
if(!isHasPower(auth,item)){
return null;
}
if (item.children && item.children.some(child => child.name)) {
const childrenItems = getNavMenuItems(item.children, index,auth);
if (childrenItems && childrenItems.length > 0) {
const name = `\u00a0\u00a0${item.name}`;
const subNav = (
<SubNav key={index} icon={item.icon} label={name}>
{childrenItems}
</SubNav>
);
return subNav;
}
return null;
}
const navItem = (
<NavItem key={item.path} icon={item.icon}>
<Link to={item.path}> {item.name}</Link>
</NavItem>
);
return navItem;
}
|
路由迁移
新项目不需要routerConfig.js,将该文件内容迁移到routes.js,同时也不需要router.jsx
目录结构的调整:
迁移前位于:KafkaCenter-Frontend/src/router.jsx|routerConfig.js
迁移后位于KafkaCenter-Frontend/src/routes.js
这里要注意一下,因为存在redirect功能,也就是无法匹配,重定向到指定页面。还有路由支持层级结构。这里拿用户登录举例:
1
2
3
4
5
6
7
8
9
10
11
12
13
14
| {
path: '/user',
component: UserLayout,
children: [
{
path: '/login',
component: Login,
},
{
path: '/',
redirect: '/user/login',
},
],
}
|
redirect一定要放在最后,血泪史。。。。
权限迁移
这点官网确实做的不错,基本参照官网即可完成。唯一不足的是菜单的权限搞了很久,因为没有文档,需要自己实现权限逻辑。
初始化
安装插件,配置检查。参照官网
然后在app.jsx初始化默认权限
1
2
3
4
5
6
7
8
9
10
11
12
13
14
15
16
17
18
19
20
21
22
23
| const appConfig = {
app: {
//....
getInitialData: async () => {
const user = JSON.parse(sessionStorage.getItem('user'));
if(user==null){
return {
auth: {
role: 'member'
}
}
}
// 约定权限必须返回一个 auth 对象
// 返回的每个值对应一条权限
return {
auth: {
role:user.role === 'ADMIN'?'admin':'member',
}
}
},
},
};
|
修改权限
我这里是登录后,修改用户权限
1
2
3
4
5
6
7
| import { useAuth } from 'ice';
....
const [auth, setAuth] = useAuth();
// 更新权限
function updateAuth() {
setAuth({ role:user.role === 'ADMIN'?'admin':'member' });
}
|
菜单权限
这里就比较麻烦,不是修改麻烦,而是没有文档,自己琢磨,花费了一点时间。需要自己修改菜单的渲染逻辑。主要修改KafkaCenter-Frontend/src/layouts/BasicLayout/components/PageNav/index.jsx
首先在menuConfig.js中给需要设置权限的菜单处,增加authority: ['member'],
然后再修改PageNav/index.jsx
1
2
3
4
5
6
7
8
9
10
11
12
13
14
15
16
17
18
19
20
| const isHasPower=(auth,item)=>{
if(Object.getOwnPropertyNames(item).includes('authority')){
const authority = item.authority.toString();
if(auth.role!==authority.toLocaleLowerCase()){
return false;
}else{
return true;
}
}else{
return true
}
}
function getSubMenuOrItem(item, index,auth) {
if(!isHasPower(auth,item)){
return null;
}
// 略....
}
|
按钮权限
推荐官方做法,自定义权限组件。例如我们的做法
1
2
3
4
5
6
7
8
9
10
11
12
13
14
15
| import React from 'react';
import { useAuth } from 'ice';
function Auth({ children, rolename }) {
const [auth] = useAuth();
// 有权限时直接渲染内容
if (rolename===auth.role) {
return children;
} else {
// 无权限时显示指定 UI
return(<div/>);
}
};
export default Auth;
|
使用如下:
1
2
3
4
5
6
7
| <Auth rolename="admin">
<span style={styles.separator} />
<span title="Modify" style={styles.operBtn} >
<a style={styles.link} onClick={() => this.handleUpdate(record)}>
Modify
</a>
</Auth>
|
布局迁移
登录页面重写,主页布局重写。其他的略。。下班了,懒得写了。
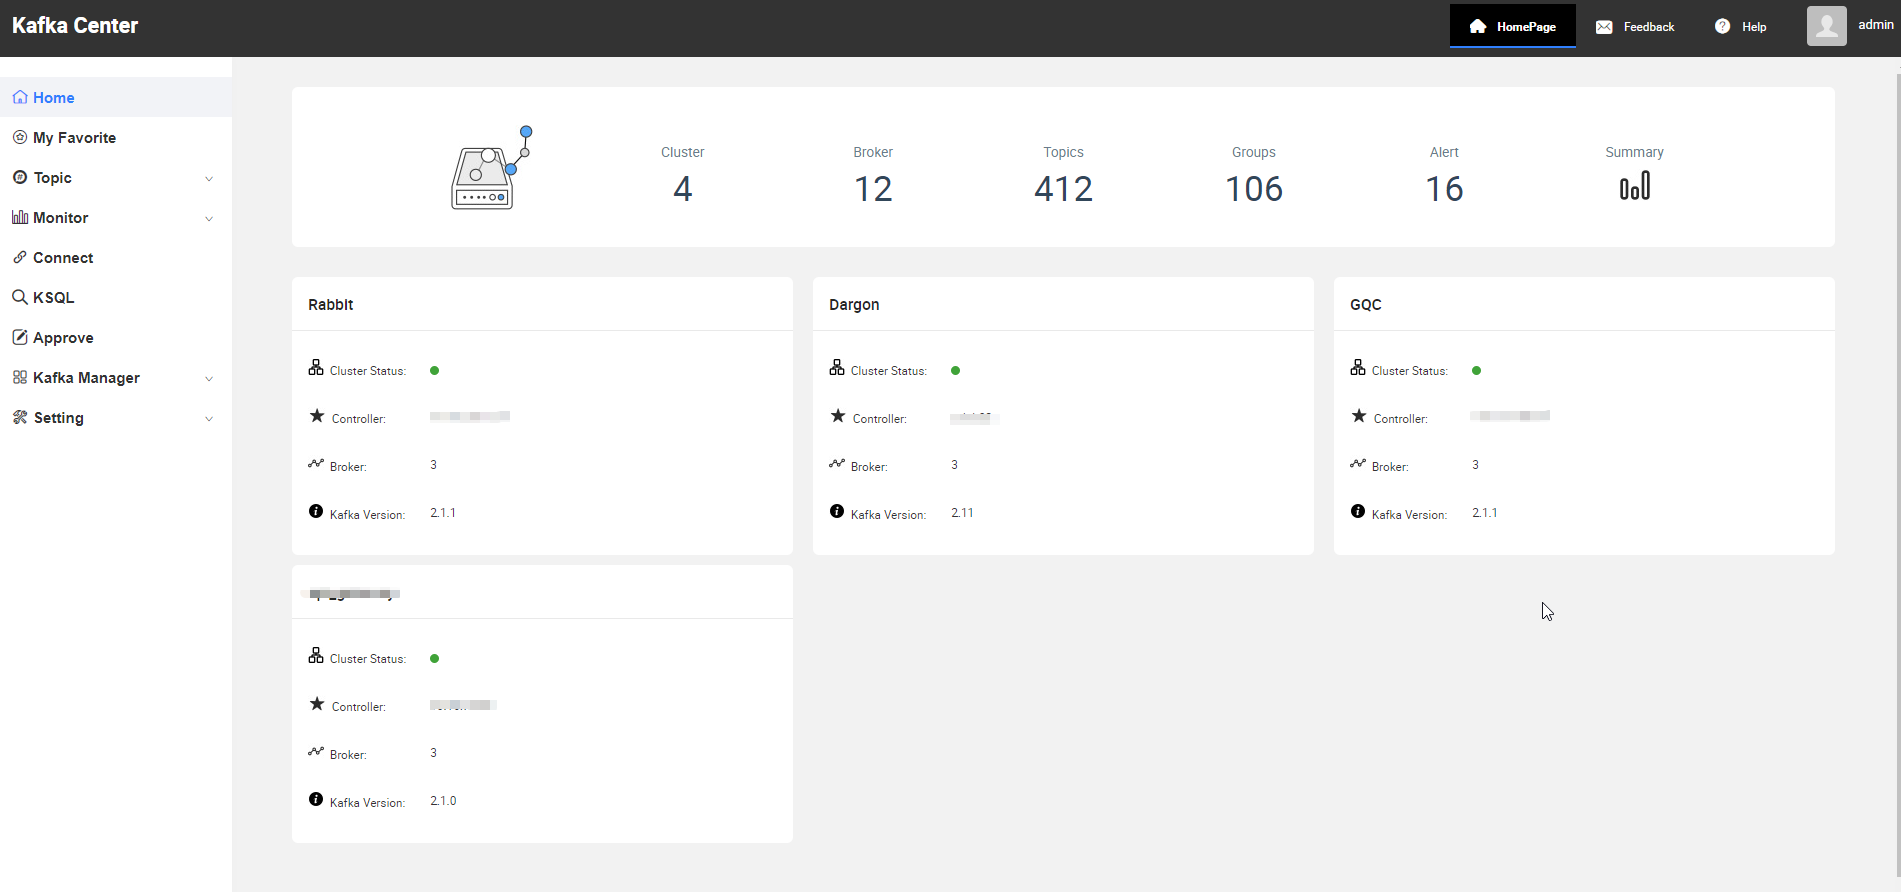
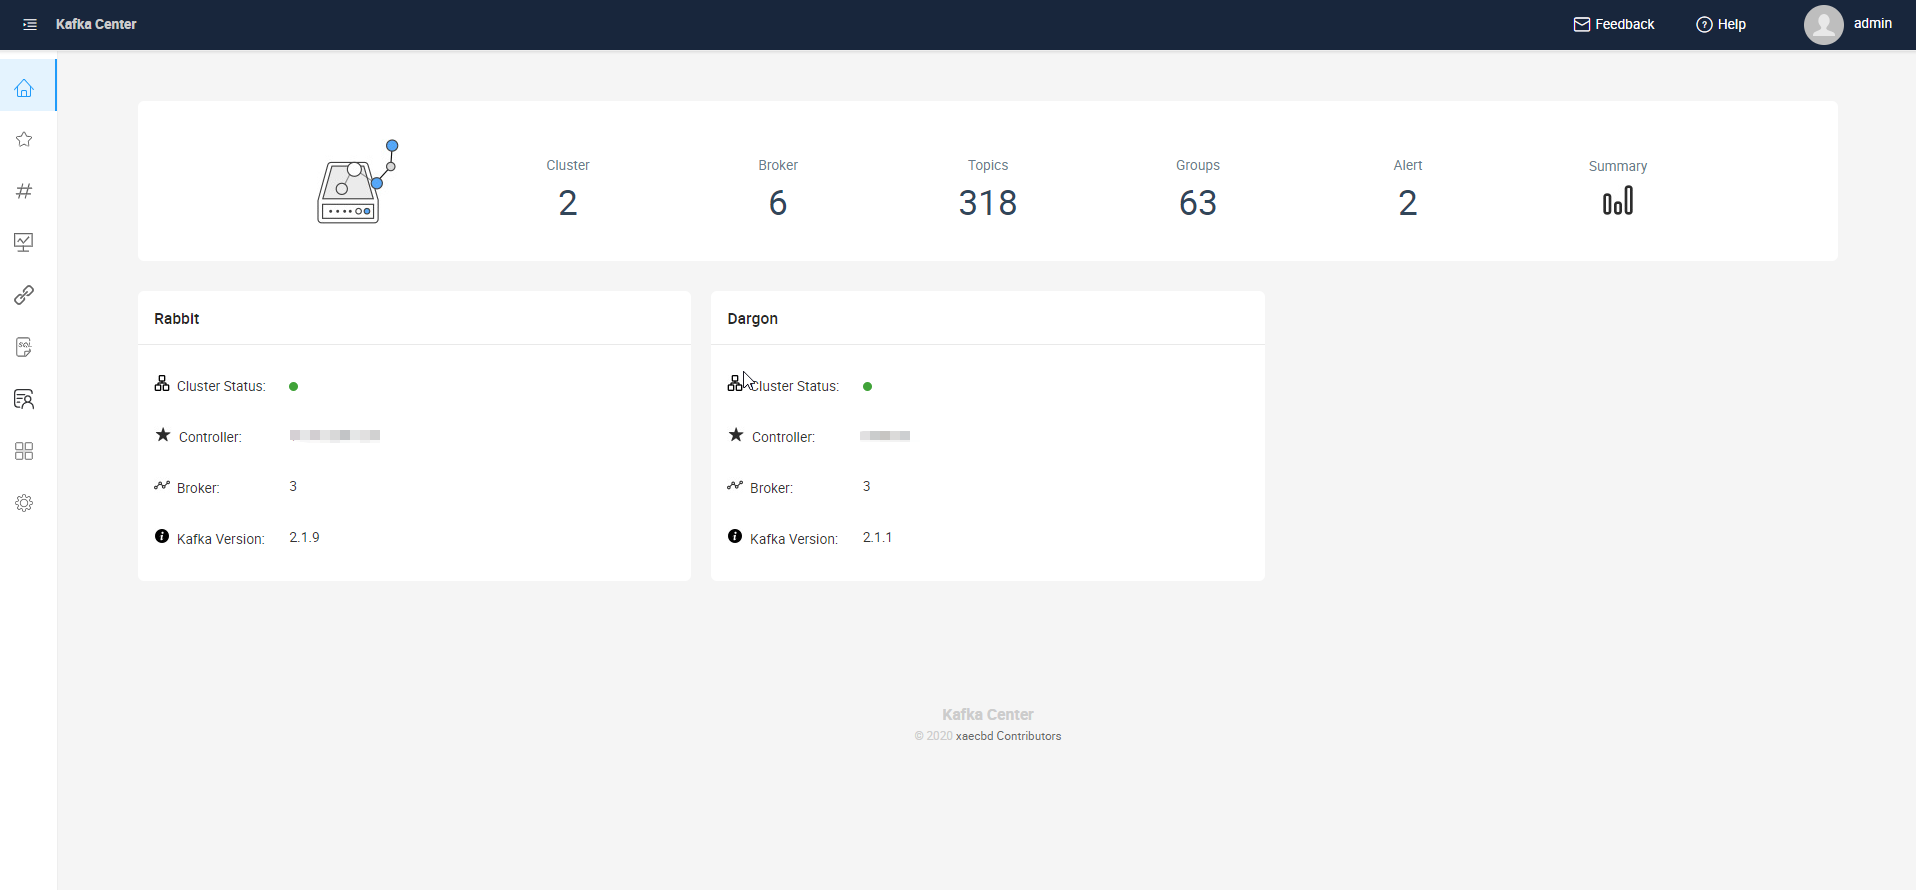
前后系统界面变化对比
修改前:

修改后:

参考
- https://reactrouter.com/web/api/Hooks/usehistory
- React 的函数组件
- Using the State Hook